

Easy to use once set up
Plug in your drive, open the app — that's it. The rest happens on its own.
Why use USB Vault for your USB photo and video backup?
Cloud storage sounds convenient, but it comes with three problems that USB Vault solves.
Cloud storage compresses your photos
You pay for a phone with an amazing camera, then cloud services quietly reduce your photo resolution to save on their storage costs. USB Vault keeps every pixel — your backups are byte-for-byte identical to the originals.
Cloud subscriptions cost more than owning a drive
A pair of 4 TB USB drives costs around £200. That gives you 4 TB of mirrored storage you own forever. The equivalent cloud subscription sometimes start costing more after just five months — and a USB drive lasts for years. There is no lock-in either: your backups are plain files you can manage yourself at any time.
Your photos stay private
Cloud providers can change their terms at any time. With USB Vault your photos never touch the internet. They go from your phone to your USB drive and back. Nothing else can access them.
Key USB photo and video backup features
Gallery with sync-status icons
Browse your photos organised by month and year. Each thumbnail shows its sync state at a glance. When you plug in a drive that contains photos no longer on the phone, those photos appear in the gallery so you can browse or restore them.
Mirror redundancy
Link two or more drives into a mirror group. The app cross-checks them automatically and restores any file that was accidentally deleted from one drive using the other.
Integrity verification
Every backed-up file has an MD5 checksum embedded in its filename. Run a verification at any time to detect corruption before it becomes a problem.
What you need for USB photo and video backup
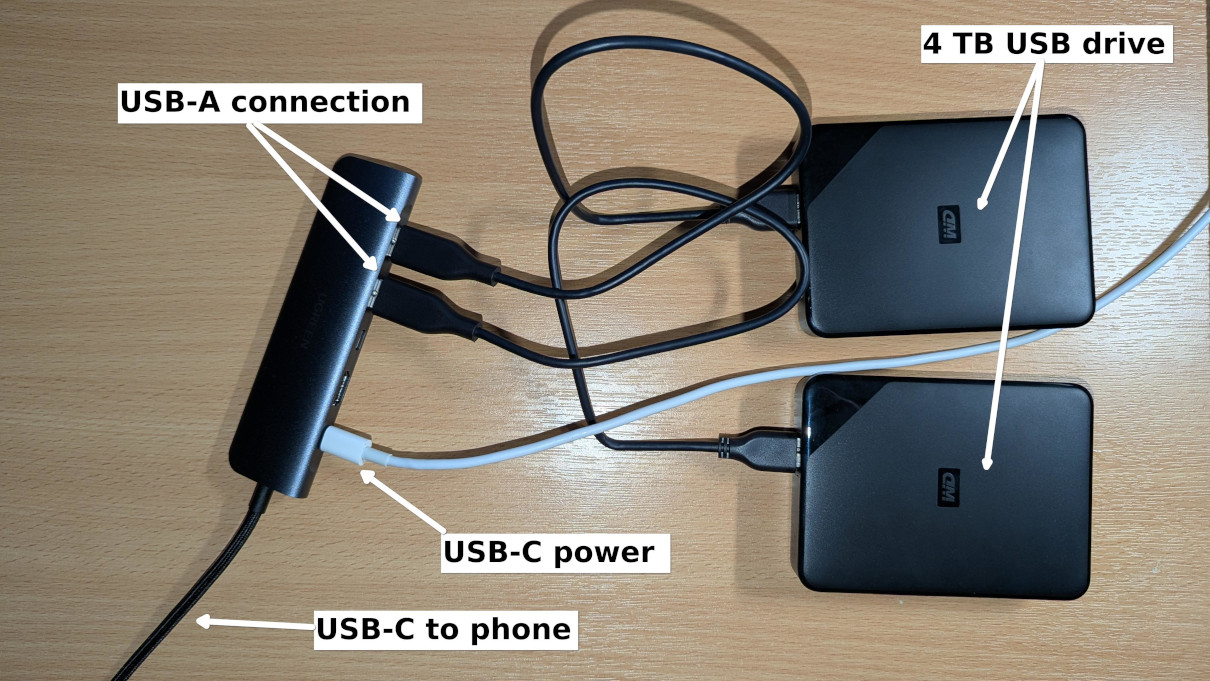
Below is an example setup (mine) to show what is possible. Photos and videos can be synced every time the phone is plugged in to charge. The only step after plugging it in is to open the app then the screen can be locked again. Minimally only one drive is required. This way the experience can be tested before committing to buying new drives.
When a drive is plugged in, if it is formatted with an incompatible filesystem, Android will give you the opportunity to reformat it with a compatible one. The video shows the Issue with WD USB drive notification and the format window that opens when you tap it. Warning: Tapping format will erase all the data on your drive.
Best practices for USB photo and video backup
Android uses the exFAT filesystem for USB drives, which can be sensitive to unexpected disconnects. Follow these three rules to keep everything running smoothly:
- Always eject your drive before unplugging
- Use at least one mirror backup for redundancy
- Connect drives one at a time
The video shows the ejection process. Drag down on the notification twice to expand it, tap Eject, then wait. You will see an intermediate state saying Ejecting — Don't remove. Only unplug once the toast at the bottom of the screen confirms safely ejected and the drive disappears from the dropdown.
User journey
Here is what to expect from first launch to your first backup.
First opening the app
On the first startup you will see a series of Android permission prompts. Below is what each one does and which option to choose.
- Permissions info prompt — An introductory dialog explaining that two Android system prompts will follow. Tap Ok.
- Notification permission — The app will never send you notifications. It uses this permission to post silent progress updates in the Android dropdown so you can monitor long backups from other apps. It also prevents Android from killing the app while a backup is running. Select Allow.
- Photo & video access — Needed to display your photos in the gallery and to delete them when you ask. Deletions always require a confirmation prompt — nothing is ever deleted silently. Select Allow all. Choosing "Allow limited access" works, but you will have to manually pick files and re-confirm on every app restart.
After granting permissions you will see the gallery, with your photos grouped
by year and month. Every photo starts in the unsynced state, shown by the
 icon in the top-right corner. Tap and hold any photo to enter multi-selection mode.
Setting up a backup
You only need to do this once per drive. After setup, backups happen automatically whenever the drive is plugged in and the app is open.
- USB drive backup prompt — Appears when the app detects a new USB drive. Tap Select Folder.
- Folder picker — Opens at the root of the USB drive. Check that the drive name shown at the top matches your USB drive. If it does not, ask in the Discord server. Tap Use this folder.
- Folder permissions — Grants the app read/write access to the selected folder and its subfolders. If you prefer not to give access to the entire drive, create a dedicated folder first and select that instead. Tap Allow.
- Backup import dialog — If the drive already contains photos or videos you will see this dialog. It is useful when switching phones — the app scans existing files and matches them to what is on your device to avoid duplicates. If the drive is empty this step is skipped.
- New backup name — The name you enter here (plus an auto-generated random suffix) becomes the folder name where your backed-up files are stored.
- Imported backup state — Only shown when importing. Open means the app will continue backing up new files to this drive. Closed means the drive is full — the app will not add new files but will still track its contents to avoid duplicates on other drives.
- Mirror linking — Links two drives so the app keeps them in sync. If a file is accidentally deleted from one, the other restores it. Select Link to enable, or "Don't mirror" to skip.
App features
-
Automatic backup — Once setup is complete, the app
syncs your photos and videos automatically. Progress is shown in a
ribbon above the gallery and in the Android notification dropdown.
After syncing, each photo shows
 if it is on all managed drives, or
 if it is on at least one.
- Free up space — Use the slider to remove the oldest fully-synced photos from your phone. They remain on your USB drives and still appear in the gallery when a drive is connected.
- Period restore — The reverse of "Free up space". Use the slider to copy backup-only photos back to your phone, starting from the newest.
-
Backups management screen — Tap Vaults
to see all managed drives, the number of backed-up files, and mirror
group membership. From here you can:
- Rename — Change the user-chosen part of the backup folder name.
- Remove — Make the app forget a backup. Files on the USB drive are not deleted.
- Verify — Check every backed-up file against its MD5 hash to detect corruption.
- Last verify status — View the result of the most recent verification.
- Close — Mark a full drive as closed. The app stops writing to it but tracks its contents to avoid duplicating files on a new drive.
Manual photo & video management
Beyond automatic syncing, you can manage individual photos and videos by hand.
- Multi-selection — Long-press any photo to enter multi-select mode. Use the trash icon to delete or the cloud-download icon to restore backup-only items.
- Deletion (on-device photos) — You will be asked whether to delete from the phone only or from both phone and backup. Phone-only deletion keeps the photo accessible in the gallery whenever the drive is connected.
- Android confirmation — Regardless of which option you choose, Android will ask you to confirm before anything is removed.
-
Backup-only browsing — Photos that exist only on a
USB drive appear in the gallery when the drive is connected, marked with
 .
A jump button at the bottom of the screen takes you to the newest
backup-only photo.
.
A jump button at the bottom of the screen takes you to the newest
backup-only photo.
- Restoring from backup — Select one or more backup-only photos and tap the cloud-download icon to copy them back to your phone.
- Deleting backup-only photos — When only backup-only items are selected, the delete button shows a separate confirmation prompt. This action is permanent and cannot be undone.
USB photo and video backup file naming format
Every file written to a backup follows this naming scheme:
| Segment | Example | Notes |
|---|---|---|
YYYY-MM-DD-HH-MM |
2024-11-03-14-22 |
Capture date from EXIF; falls back to file modification time |
MD5_HASH |
a3f8c12d9e7b4f0165d823bf90c14e72 |
MD5 of the original file content, used for integrity verification |
originalName |
IMG_4821 |
Original filename without extension, used when restoring |
.ext |
.jpg |
Original file extension, preserved as-is |
Each backup folder also contains a metadata.json file that stores mirror group associations and backup configuration.
Subscription
The app costs £5/year after a free trial — that is 42p/month. There is only the option to pay yearly but you can cancel at any time.
No lock-in. Your backups are ordinary files on a USB drive you own. If you stop paying, the files stay exactly where they are and you can continue managing them manually. The app never moves, encrypts, or hides your data behind a proprietary format.
Community — feedback, requests & support
I have created this Discord server to give people an easy option to use for sharing feedback, requests and support.
 Join the server
Troubleshooting
A drive has been plugged in and nothing happens
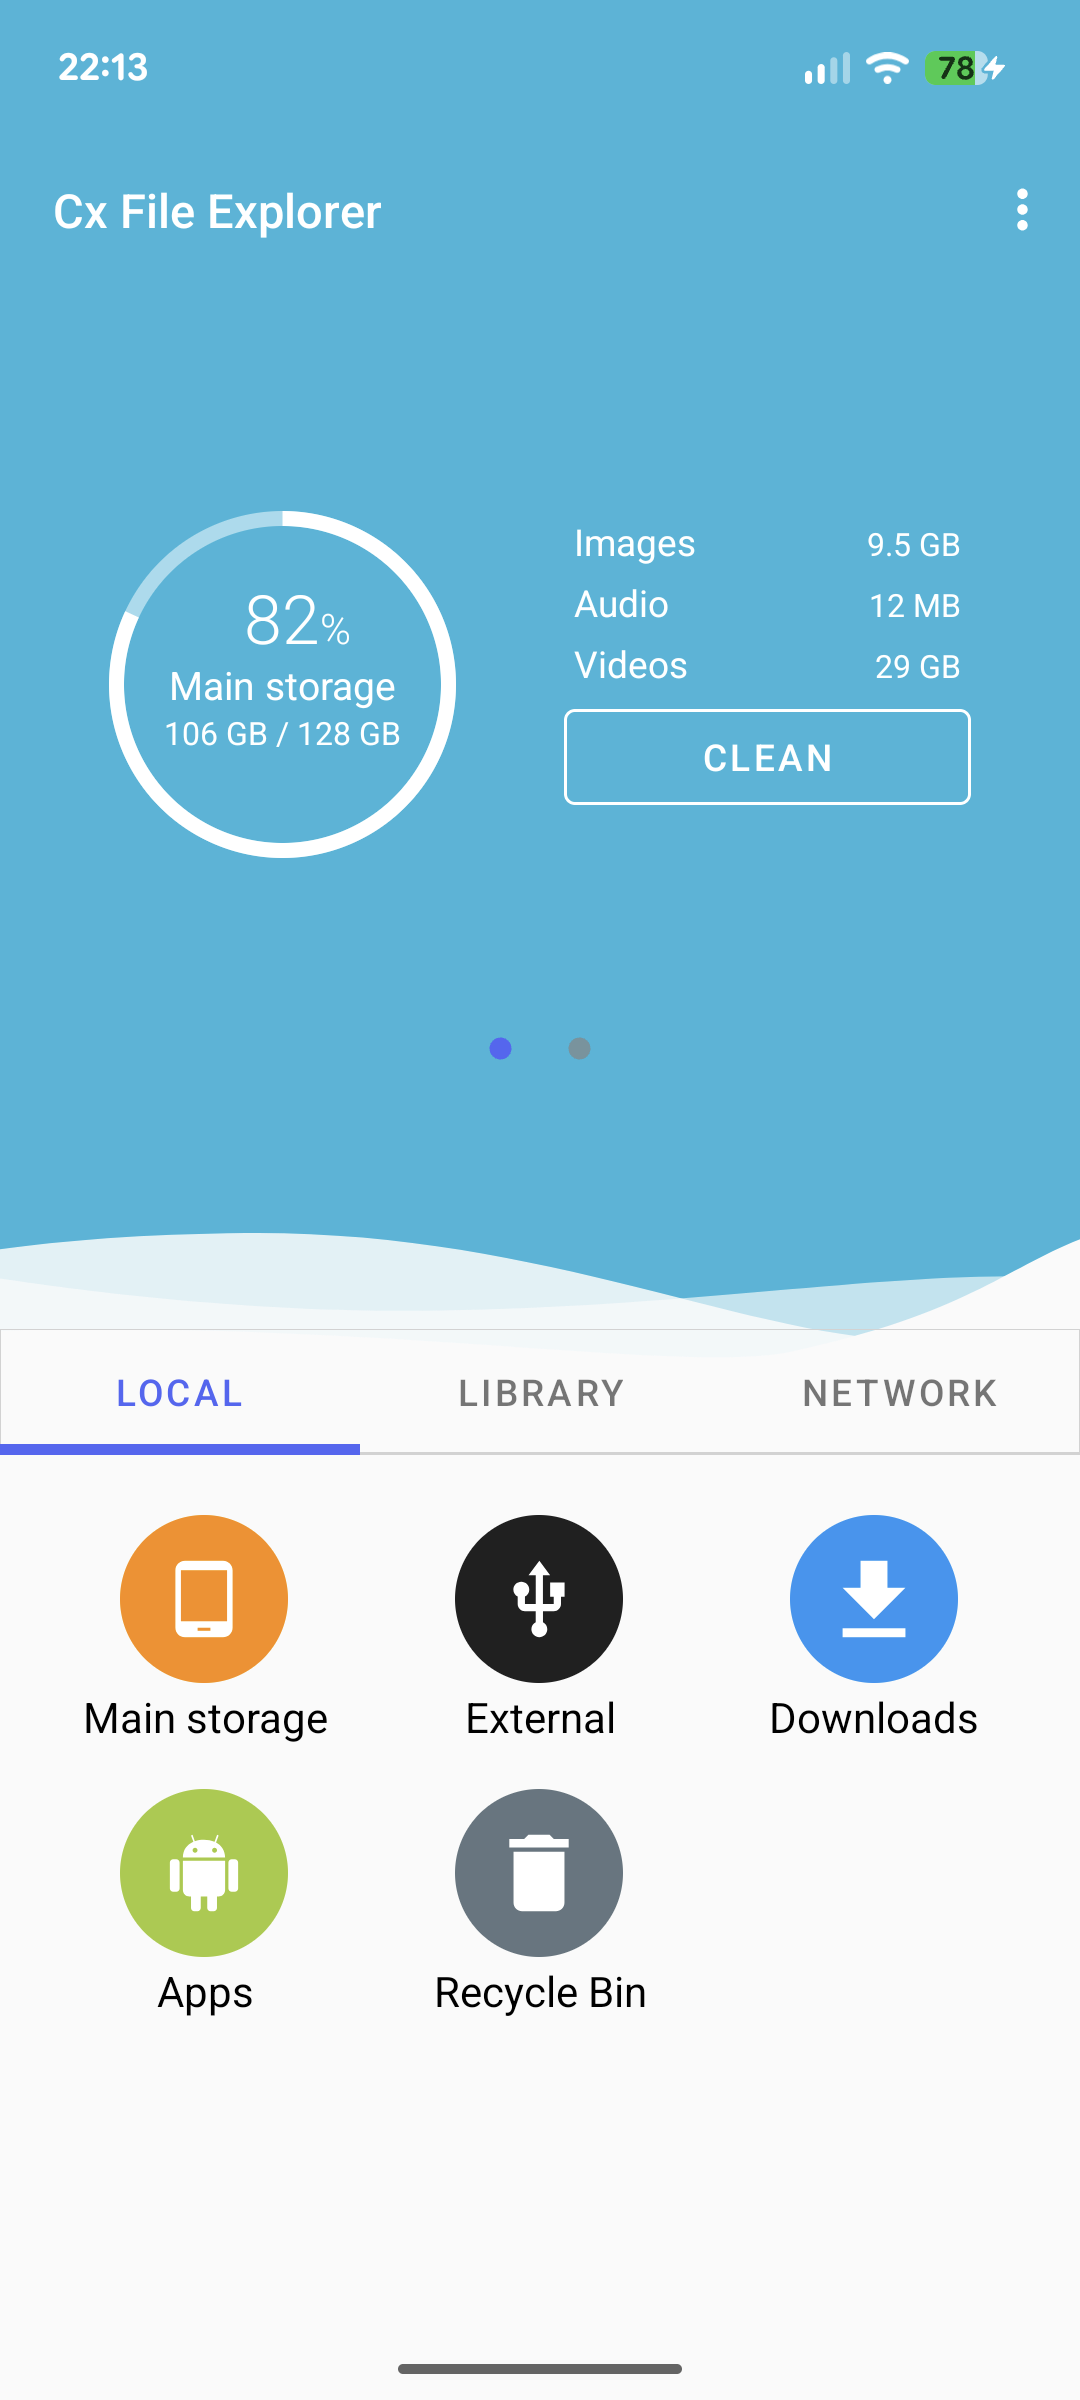
To determine if the phone is seeing the drive at all please use a file explorer app, like Cx File Explorer . Below, under the LOCAL tab, a USB icon can be seen with the name External under it. That is the USB drive and this tells us that the phone can see it but there is something wrong with the app. In this case, support can be requested via the discord server.
Frequently asked questions
How do I backup photos to a USB drive on Android?
Install USB Vault from the Google Play Store, plug a USB drive into your Android phone using an OTG adapter, and open the app. It will detect the drive and walk you through a one-time setup. After that, your photos and videos are backed up automatically every time you plug the drive in and open the app.
Does USB Vault compress my photos?
No. USB Vault creates byte-for-byte copies of your original files. Your backups are identical to the originals — no compression, no resizing, no quality loss.
Do I need an internet connection to use USB Vault?
No. USB Vault never connects to the internet. All data transfers happen directly between your phone and your USB drive over the cable. Your photos stay completely private.
What happens to my backups if I cancel the subscription?
Your files stay exactly where they are on your USB drives. They are ordinary files in standard formats — you can browse, copy, and manage them with any file explorer. There is no lock-in and no proprietary format.
Can I use USB Vault with multiple USB drives?
Yes. You can set up as many drives as you like and even link two drives as mirrors for redundancy. If a file is accidentally deleted from one drive, the app restores it from the other.
How does USB Vault verify my backups are not corrupted?
Every backed-up file has an MD5 checksum embedded in its filename. You can run a verification at any time from the backup management screen to check every file against its hash and detect corruption early.